Using ANPR Cameras with VOLO
This article describes how to integrate Automatic Number Plate Recognition (ANPR) cameras with the VOLO access control system for vehicle access management.
info
These instructions are based on our internal testing, which has been performed using a HIKVISION iDS-2CD7A26G0/P-IZHSY ANPR Camera.
Other cameras that offer Wiegand outputs are likely to work, if the output format can be aligned with a reader configuration in VOLO.
If you have worked through this guide and cannot get your camera to work, please contact us for support.
Overview
ANPR cameras can be integrated with VOLO controllers to provide automated vehicle access control. When a vehicle approaches, the ANPR camera captures an image of the license plate, processes it to generate an access card number, and sends this data to the VOLO controller in a format it can understand.
How ANPR Works with VOLO
| 1 | Image Capture | The ANPR camera captures an image of the vehicle's license plate |
| 2 | Plate Recognition | The camera's built-in software processes the image to extract the number plate text |
| 3 | Data Transmission | The recognized plate number is converted to a Wiegand format and sent to the VOLO controller |
| 4 | Access Decision | VOLO compares the plate number against authorized vehicles and grants or denies access |
| 5 | Event Logging | All access attempts are logged in the VOLO system for audit purposes |
Benefits
| Automated Access | No need for drivers to present cards or tokens |
| Audit Trail | Complete record of vehicle access with timestamps |
| Flexible Management | Easy to add/remove authorized vehicles through the VOLO interface |
| Integration | Works seamlessly with existing VOLO access control infrastructure |
Hardware Requirements
ANPR Camera Specifications
When selecting an ANPR camera for use with VOLO, ensure it meets the following requirements:
| Interface | Wiegand - the camera must offer a Wiegand interface output to work with VOLO |
| Format | The camera must offer a Wiegand format supported by VOLO |
caution
Please note that some cameras will require you to manually upload number plates and the token number that you would like to be linked with each of them, for example, "when you see AB12 CDE, send token number 1234567".
Others will use an in-built algorithm that generates a token number from the number plate. Using this option does not require you to upload any data to the camera.
Cable Requirements
| Data Cable | Shielded twisted pair cable for Wiegand signals |
| Distance | Maximum 100m for reliable Wiegand communication |
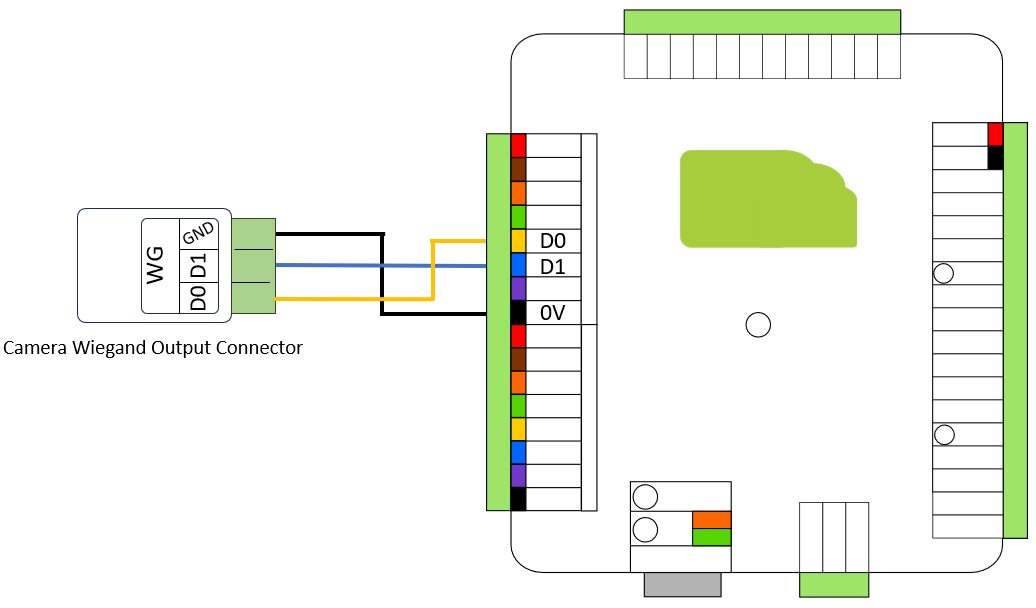
Wiring Configuration
Connecting to VOLO Controller
ANPR cameras connect to VOLO controllers through the reader ports. Each VOLO controller has two reader ports that can accommodate ANPR cameras.
Wiegand Wiring Connections
| Camera Connection | VOLO Connection | |
|---|---|---|
| Data 0 (D0) | → | Reader port Data 0 |
| Data 1 (D1) | → | Reader port Data 1 |
| Ground (GND) | → | Reader port Ground |
Wiring Diagram
Camera Configuration
Basic Setup
Physical Installation
- Mount camera at appropriate height and angle for optimal plate capture
- Ensure adequate lighting for the capture area
- Position camera to minimize glare and shadows
Camera Settings
- Configure capture zone to focus on license plate area
- Set appropriate exposure and gain settings
- Enable IR illumination for night operation
Wiegand Output Configuration
The ANPR camera must be configured to output data in a Wiegand format that VOLO can understand.
Standard Wiegand Formats
tip
We have tested the following formats, but others may also work.
VOLO has a flexible Custom Wiegand Reader feature that will allow you to configure a wide variety of options. Please get in touch if you would like us to assist in some testing and validation of a new ANPR camera or Wiegand format.
| Wiegand Format | Online Calculator | Notes |
|---|---|---|
| SHA-1 26-bit Wiegand | Convert Number Plates to Token numbers using SHA-1 | Most common format - converts a number plate into a numeric value and use the low 3 bytes as the token number |
| NEWG 72-bit Wiegand | Coming Soon... | Extended format - converts the full number plate from ascii characters to a single numeric (long!) value |
Configuration Steps
Access Camera Configuration
- Connect to camera via web interface or configuration software
- Navigate to output settings or Wiegand configuration
Set Output Format
- Select Wiegand output type
- Configure Wiegand format:
- SHA-1 26-bit Wiegand
- NEWG 72-bit Wiegand
Test Output
- Use camera's test function to verify Wiegand output
- Check data format matches VOLO expectations
VOLO Software Configuration
Reader Configuration
Select Reader Type
- Log into VOLO web interface
- Navigate to the appropriate Site and Door
- Edit the Door
- Select appropriate reader type for your ANPR camera
- 26 bit Wiegand Reader
- 26 bit Wiegand - OEM LED Style
- Custom Wiegand Reader (Define the format you require)
Custom Reader Setup (if required)
- If using the NEWG 72-bit format, or another format, you will need to define a custom Wiegand Reader Format
- Follow instructions in Custom Readers guide
- Configure bit length and data format
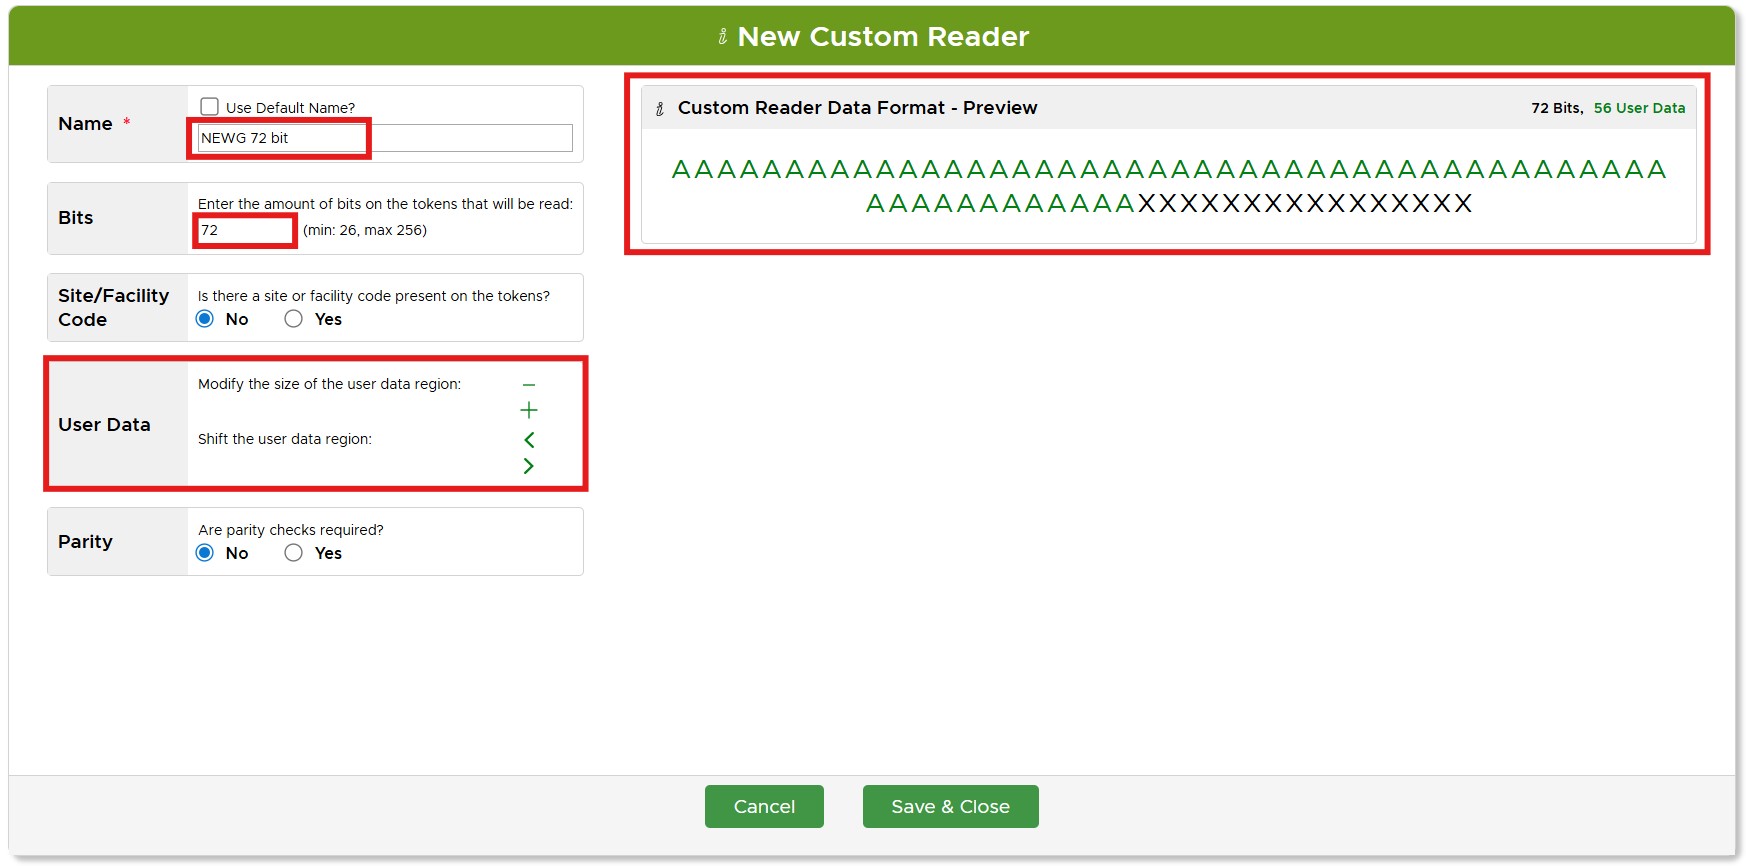
NEWG 72-Bit Custom Format Example
Use the settings shown in the image below to configure your VOLO reader:
- Enter a meaningful name so that you can identify the reader later "72-bit NEWG Format"
- Set the number of bits to 72
- Leave Site/Facility code set to NO
- Set the User Data region to be 56 bits long and fully left-aligned (the last 16 characters should be X's)
- Leave the Parity setting set to NO
Testing and Validation
System Testing
Basic Functionality Test
- Test with known authorized vehicles
- Verify access granted events are logged
- Test with unauthorized vehicles
Performance Testing
- Test recognition speed and accuracy
- Verify system response times
- Test under various weather conditions
Troubleshooting
Common Issues
- Poor image quality affecting recognition
- Camera angle affecting recognition
- Camera firmware bug affecting recognition
- Incorrect Wiegand format configuration on camera
- Incorrect Wiegand format configuration in VOLO
caution
We have encountered situations where the ANPR camera misreads the number plate and then converts the incorrect number plate into a token value.
VOLO, sees the token value based on the misread number plate and, correctly, denies access.
Connect to your camera's built-in web interface and verify that it is interpreting the number plates it sees, correctly.
Generally, we have found that everything works well together, provided that the camera can correctly recognise/interpret the number plate.
Diagnostic Steps
- Confirm the Wiegand format you want to use (e.g. SHA-1 26-bit, NEWG 72-bit)
- Use a web browser to log in to the camera
- Check the Wiegand configuration settings
- Validate the Number Plate capture (is the camera correctly recognising the number plates?)
- Log in to Volo
- Check the Wiegand coniguration settings
- Is the token number displayed in the VOLO event log as you would expect?
Maintenance and Monitoring
Regular Maintenance
Camera Maintenance
- Clean camera lens regularly
- Check and clean IR illuminators
- Verify camera positioning and focus
System Monitoring
- Monitor recognition accuracy rates
- Review access logs for anomalies
- Check system performance metrics
Performance Optimization
Lighting Optimization
- Ensure adequate lighting for capture area
- Minimize glare and shadows
- Consider additional lighting if needed
Camera Positioning
- Optimize camera angle for best plate capture
- Ensure consistent capture zone
- Minimize environmental interference